Mahfuz AHMAD
Project Sneak Peek
IoT Smart Chessboard
An AI-powered physical chessboard that detects human moves using computer vision, calculates responses using the Stockfish engine, and visualizes moves directly on the board using an LED matrix.
Project Overview
This system bridges the gap between physical and digital chess. It uses a camera to watch a real chessboard, processes the video feed to understand the game state, and communicates with an ESP32 microcontroller to light up LEDs on the board, guiding the player.
Key Features
- Computer Vision Move Detection: Uses OpenCV to detect piece movements without requiring magnetic sensors or special pieces.
- Stockfish Integration: Calculates the best moves using the world’s strongest open-source chess engine.
- IoT Communication: Uses Blynk to transmit move data instantly between the Python backend and the physical board.
- LED Move Guidance: The board lights up to confirm human moves and indicate the engine’s response.
- Motion Stability Check: Advanced filtering ensures moves are only registered when the player’s hand has left the board.
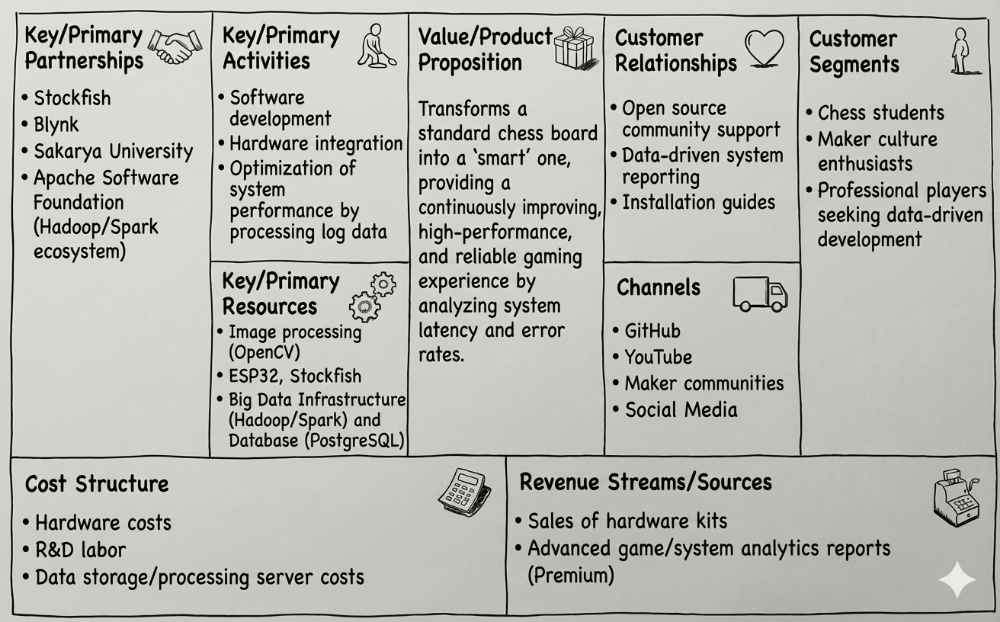
Business Model Canvas
The following table outlines the business model for this project, detailing its value proposition, customer segments, and operational structure.
Project Structure
The project is divided into two main directories:
1. vision_part/ (The Brain)
Runs on a PC/Laptop. It handles:
- Capturing video from the camera (webcam or IP camera).
- Processing images to detect board state and chess moves.
- Running the Stockfish engine.
- Sending move commands to the IoT cloud.
2. board_part/ (The Hardware)
Runs on an ESP32 microcontroller. It handles:
- Connecting to WiFi and the Blynk IoT cloud.
- Receiving move commands (e.g., “e2e4”).
- Controlling the 8x8 LED matrix to light up the source and destination squares.
Getting Started
Prerequisites
Hardware:
- ESP32 Development Board
- 8x8 LED Matrix (or 64 individual LEDs wired in a matrix)
- Webcam or Smartphone (acting as an IP Camera)
- Physical Chessboard & Pieces
Software:
- Python 3.x
- Arduino IDE (for ESP32)
- Stockfish Engine Executable
Installation & Setup
A. Vision Part (Python)
-
Navigate to the folder:
cd vision_part -
Install dependencies:
pip install opencv-python numpy python-chess requests - Configure
main.py: Openmain.pyand update the following variables at the top:BLYNK_AUTH: Your Blynk Auth Token.CAMERA_URL: The IP address of your camera (or0for USB webcam).STOCKFISH_PATH: The absolute path to your downloadedstockfish.exe.
-
Run the Brain:
python main.py
B. Board Part (ESP32)
-
Open the Code: Open
board_part.inoin the Arduino IDE. - Install Libraries:
Go to Sketch > Include Library > Manage Libraries and install:
Blynkby Volodymyr ShymanskyyWiFi(Built-in for ESP32)
-
Configure Credentials: Update the top of the file with your details:
#define BLYNK_TEMPLATE_ID "YOUR_TEMPLATE_ID" #define BLYNK_DEVICE_NAME "SmartChess" #define BLYNK_AUTH_TOKEN "YOUR_AUTH_TOKEN" // Must match the one in Python char ssid[] = "YOUR_WIFI_NAME"; char pass[] = "YOUR_WIFI_PASSWORD"; - Upload: Connect your ESP32 via USB and upload the sketch.
How to Play
- Power Up: Plug in the ESP32. It will connect to WiFi.
- Start Vision: Run the
main.pyscript on your PC. - Calibrate:
- A window will appear showing the camera feed.
- Click the 4 corners of the chessboard in order: Top-Left -> Top-Right -> Bottom-Right -> Bottom-Left.
- Tune (If needed):
- Use the sliders in the “Debug View” to adjust brightness/contrast thresholds until the green circles perfectly match the white pieces and pink circles match black pieces.
- Press SPACE to start the game.
- Make a Move:
- Play a move as White.
- The LEDs will light up to confirm your move.
- Wait a moment…
- The LEDs will then light up to show Stockfish’s reply (Black).
- Your Turn: Physically move the Black piece as instructed, then play your next move.
Pin Mapping (ESP32)
This mapping assumes an 8x8 matrix where Columns (Files) are Anodes (+) and Rows (Ranks) are Cathodes (-).
| Chess File | ESP32 Pin | Chess Rank | ESP32 Pin |
|---|---|---|---|
| File A | GPIO 23 | Rank 1 | GPIO 32 |
| File B | GPIO 22 | Rank 2 | GPIO 33 |
| File C | GPIO 21 | Rank 3 | GPIO 25 |
| File D | GPIO 19 | Rank 4 | GPIO 26 |
| File E | GPIO 18 | Rank 5 | GPIO 27 |
| File F | GPIO 17 | Rank 6 | GPIO 14 |
| File G | GPIO 16 | Rank 7 | GPIO 12 |
| File H | GPIO 4 | Rank 8 | GPIO 13 |
This project was developed as part of the IoT Project coursework for the 2025-26 Fall Semester, Department of Computer Engineering, Sakarya University.